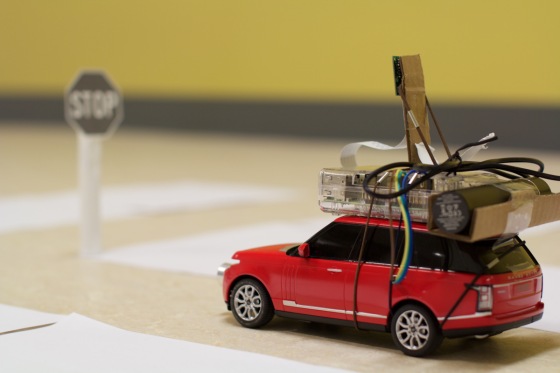
Self-driving remote control model car uses Raspberry Pi as brain

Zheng Wang has taken a model Range Rover and slapped a Raspberry Pi and camera module on top, along with a portable power supply. His aims were to build a system that would

  • self-drive along a track
  • detect stop signs and traffic lights
  • avoid front collisions

Through a lot of image processing and detection, he has achieved his goals. Yhttps://zhengludwig.wordpress.com/projects/self-driving-rc-car/ou can read more about the project on his blog, including all the maths he had to do.

Raspberry Pi digital empathy booth ignores your every desire

The Empathy Machine from Joanna Hopkins on Vimeo.

Artist Joanna Hopkins and programmer Alanna Kelly have teamed up to create The Empathy Machine. The machine encourages people to enter the booth and then engage in conversation with a digital person who is shown on-screen. Questions are asked, responses are given, but the digital person is intentionally glitchy and doesn’t really listen at all. It has been designed to highlight the problems with new technology that is glitchy and not able to replace real human interaction. A Raspberry Pi is at the core of the programming. Find out more about the artist and her work here.

Thanks to Pi Weekly for spotting this one

Build circuits with this nifty crowdfunded Raspberry Pi HAT

Alex Eames has just launched his latest Kickstarter. Following successful campaigns for the RasPiO GPIO Ruler and RasPiO Duino, he is now raising funds for the RasPiO Pro HAT.

Key features

This HAT’s key features are as follows:

  • protected GPIO ports to prevent damage to the Pi and components if you wire things up incorrectly
  • numerically-ordered GPIO ports
  • fully assembled – requires no soldering to use in its basic form
  • includes a 170pt mini-breadboard to build your circuits on
  • provides extra GPIO break-outs for un-protected tinkering
  • 330 ohm resistors pre-installed on each GPIO port so you can use LEDs without additional resistors

Alex is also planning some RasPi.TV-style tutorials and written examples to show you how to get the best out of the HAT.

First look

Alex let me have a hand-soldered prototype of the board to play around with. It’s a great idea to put all the GPIO pins in numerical order (it uses the BCM pin assignments) as it removes some of the confusion. Plus, because it uses the BCM pin assignments it means that it’s ready-to-use with the new GPIO Zero library. In fact, GPIO Zero is what I used with the example you can see wired up below. I’ve plugged the positive end of 4 LEDs (on the left) into GPIO pin header holes and then the negative end into the breadboard. I’ve then used a jumper to connect Ground to that breadboard row. I’ve also shown, with the yellow LED, that you can just bridge directly from Ground to a GPIO input pin if you want to. The GPIO Zero code was, of course, very straight-forward and I had an example up-and-running in no time. I think that is one of the key selling points of the HAT – it makes doing simple things even simpler, especially LEDs where, using the HAT, you don’t need additional resistors. I can imagine returning to the HAT time and again when I want to prototype circuits, or if I just want to play around with a component like a temperature sensor. I can also imagine a lot of schools using it rather than getting hold of individual breadboards – it’s compact, provides a way to keep the circuitry tidy and makes logical sense.

IMG_20160115_091428

Backing the Kickstarter

If you’re quick, you can get hold of a Pro HAT for just £10 plus delivery (just £1 if you’re in the UK) which is the Earlybird price. After that, it rises to £12 plus delivery. It’s great value for what is one of the most flexible tools out there. Go to the Kickstarter.

Last few days for this Kickstarter to produce a Raspberry Pi Zero prototyping board

I’ve covered this before, but just thought I’d give it a final push.

Richard Saville (aka Average Man) is currently running a Kickstarter for this nifty little prototyping board for the Zero. He’s already blown past his funding goal, so it’s definitely happening. His previous Kickstarters have all been successful, and he’s recently announced that his final prototypes have come through well, so I have no doubt he’ll hit his March delivery date, or thereabouts. So, if you’d like one (or more!) of these boards, head over to Kickstarter now and make a pledge! There are just a few days left, so don’t miss out.

GPIO Zero – the development of a new GPIO library for the Raspberry Pi

I’ve previously covered Ben Nuttall’s new GPIO library, GPIO Zero, on this blog. A few weeks ago, I had an epiphany and realised just how useful it can be. Since then, I’ve been meaning to start using it to redevelop the Picorder. This hasn’t happened yet, although I do have a Pi Zero project I’m currently working on that will use it. But more on that later.

Ben has now written a blog post in which he first of all describes how the library was sparked off in the first place, names some of the people behind it and, vitally, goes on to explain how to use it. There are some truly great features to this library, including built-in support for the analog-to-digital converter cheap MCP3008, support for most of the components that come as part of the CamJam EduKits and also a way to link two objects together so that the output from one component becomes the input for another. (He explains it better than I do, but think how useful it would be to link a potentiometer to an LED and you’re on the right track).

So, if you want to know how GPIO Zero was developed, or you’re curious as to what you can do with it, head over to Ben’s blog. It’s essential reading.